Friday, September 20, 2013

"Treetop Owl, I think this is the beginning of a beautiful friendship"

So one September night I got a custom order request that would change my shop forever. I couldn't be more grateful for Kim's request for her friend's baby shower. She sent me a simple request to make the WOODLAND OWL set to match the bedding her friend had chosen for her nursery. Here's the bedding that was the inspiration:
Crib Bedding

Close up of the quilt

Pillow

Sometimes when I get custom item requests the client likes to be really involved and see how everything is going each step of the way. I totally don't blame them because I'd totally be the same way, but Kim was the total opposite, she pretty much gave me free reign to do whatever I wanted as long as I used the colors in the bedding and that would be able to be hung in the nursery after the shower. I don't know which is more pressure! Let's get to the good stuff:

The owls:

Aqua
Orange
Peridot
Ruby

I also used:
The nest...
...and the tree!
Kim needed an "it's a boy" banner:


And a name banner for little Max:


I was also able to make lots and LOTS of cupcake toppers:


To date my TREETOP OWL items have sold more than any other item in my shop! As happy as Kim and the mommy-to-be were with their items, I was even happier and grateful to Kim for inspiring such an awesome collection of items in my shop and making so many other people happy! Oh...here's what Kim had to say when she received her items "Got everything today! OH MY GOD! Soooooooo cute! I love them. I'm sure mama will too! Thank you so much!" Oh, and she left me some pretty awesome feedback for EVERYONE to see "LOVE, LOVE, LOVE! Everything was perfect! Custom made to my liking. Soooo cute! Can't wait for the mama-to-be to see it!"

Friday, September 13, 2013

A Banner Fit for a STAR little boy!

I love any chance I can get my crafty hands on to do custom orders for customers. I understand it takes a lot of trust from people who look at my shop to take a leap of faith and ask me to create something custom for them from an invitation, nursery bedding or just from nothing in particular. The blog will mostly focus on custom projects instead of featuring items in my shop (unless they are so stinkin’ cute and I get a chance to show off my adorable puppy as a bonus!) 

I was contacted by Abi at Monkey Tree Creations to make a banner for her substituting the owls for stars on the WOODLAND OWL Custom Name Banner :


What an easy request right? Wellllll…..the more we chatted about the order the more inspired I was getting and Abi sent me a link to the invitation she was purchasing:


Blue Polkadot Invitation from sillymedesign
This is where my wheels really started turning! I was able to come up with something really special. 

Finished Banner
 For this banner I used:
  • Sapphire Blue Pearlized Cardstock
  • Peridot Green Pearlized Cardstock
  • Diamond White Pearlized Cardstock
  • Chocolate Brown Pearlized Cardstock
  • Simply Sweet Cricut Font
Pearlized Cardstock -- My Favorite!!!
I love how the shape mirrors the invite but isn't quite literal.
Layered stars inspired by the invite

I used a lighter aquamarine color cardstock in the stars for more interest
Ribbon <3
Love it when it comes together!
Any time I send out a custom order based on something someone sent me I get pretty nervous. What I think is pretty awesome might not be what the buyer had in mind. When I get that alert on my phone that says “Received Conversation from XX” my tummy flips a little. But then when I see this “I got the banner today and it’s PERFECT!! I love it! Thank you so much!” it makes all the stressing worth it!

Wednesday, September 11, 2013

Adventures in Canning!

One cold wintery night in winter....

Me: Honey, I think I want a garden.
Rob: Ok, let's get some seeds and start planting!
Me: I hope you know what you're doing, because I do not have a green thumb!

About a month later....all the seedlings are dead!

One Saturday night in late April/early May.....

Me: Honey, I think I want a gardern.
Rob: Ok, I hope it isn't like the seeds!
Me: *rolls eyes*
Rob: What do you want to plant?
Me: Tomatoes! And peppers! And onions! And broccoli! And cauliflower! And more tomatoes!!!

Fast forward to June and our garden is over flowing! We can't give all the peppers and tomatoes we have away.

<3 Garden <3
Broccoli, peppers and cukes

All those big ones are tomatoes!
This is the third time we've picked the peppers!
 So I came up with the brilliant idea to can some salsa! I didn't really go by a recipe for the salsa but a combination of a few that I found on Pinterest. I didn't follow any one close enough to link to for comparison.

**DISCLAIMER** I'm sooooooo bad at following directions and measuring when it comes to cooking! I just usually go with it and taste as I go so any food blogs I post I will try to link to the original recipe, but it is guaranteed that I did not follow the directions 100%

First I washed the jars and lids in hot water:

Ball Pint Jars
I just filled up a Meijer grocery bag with as many tomatoes as I could. I filled the sink with white vinegar and water and let the tomatoes sit and get clean. Then I scrubbed what dirt didn't come off naturally and rinsed the tomatoes. 
 Then I placed the tomatoes into a pot of boiling water for approx. 1 minute so they would get a little bit soft and I could take the skins off easily.

Ice bath for the 'matoes!
 I ended up using only the Roma tomatoes, mostly because that's all that would fit into the pot and I was getting quite the bowl full already! After the tomatoes cooled in the ice bath I peeled them.

Cut off the stemmy part and took off the skin
 While I was taking care of the tomatoes Rob roasted some jalapeno and serrano peppers. For the salsa I used 4 of each pepper chopped up with the seeds.

They smelled awesome!
After I chopped up all the tomatoes and peppers I put them back into the pot. I also added about 3 cloves of garlic, half of a red onion, half of a sweet onion, two cans of corn, a bunch of cilantro, salt and pepper and the juice of a lime. I read on one of the Pinterest recipes to add white vinegar, not sure what that did, but I added about 3/4c. of white vinegar. Then I cooked it! It cooked for about 45 minutes or so, but at least 30 minutes at boiling.

Adding the yummy!
 Then we took the boiling salsa and filled the pint jars with the salsa. Ours filled up 6 1/2 pints. We put the seals and the rings on and then submerged them into boiling water for 15 minutes.

Getting canned!!
 Here is the finished product! It took about 30 minutes for all the "buttons" on the seals to stop clicking, but they all did so that meant they were sealed!


Where's the chips??
We let them cool over night and then moved them to the basement. We did end up opening the half pint about a week after we canned and was happy with the overall taste, but disappointed the salsa didn't have more heat. We have a TON of tomatoes still in the garden so I'm going to try my hand again with the jars and seals we have leftover and see if I can get a hotter salsa!

Overall, it was super easy to do and it was a great first adventure in canning!!! 

Tuesday, September 10, 2013

Goodness....has it really been 2 years?!?!?

Yikes! I can't believe it has been over two years since I've posted anything. My "To Blog" folder of photos is overflowing on my laptop, I have so many custom projects I want to share yet somehow there just aren't enough days of the week or hours in the day to get to the blog. I suppose if I were an optimist that would be a good thing...because that means I'm out in the world having adventures (which I am), working my butt off at my "real" job (which I am too) and that I am CRAZY busy over at my Etsy shop (which I definitely am!); but I am not an optimist and I know that I have neglected the blog and chose re-runs of The Big Bang Theory, Girl Code (so obsessed) and Detroit Tiger baseball over putting together a blog post...sometimes a girl just needs to watch mindless television to clear her head!

I have lots of awesome things to share with you all and I hope that I can make the blog something that my 4 followers tell 4 people about and they each tell 4 people and then before I know it Martha Stewart is calling me up offering me a job...ok I'd settle for double digit followers (little victories!)

So stay tuned and visit soon for some super awesome custom projects and maybe a few recipes here and there! 

Tuesday, August 30, 2011

Banner Showcase: FALL

Fall is absolutely one of my favorite times of year. I was always one of those nerdy kids that couldn't wait for school to start. I think when I was younger it was because right after school started I knew my birthday was right around the corner, and I always got to play hookey on my birthday and go to lunch and shopping with my grandma. When I was in high school it meant that tennis season was here, and when I got to college it meant going back to one of my favorite places on earth Grand Valley State University.

Fall is still my favorite time of year, but for different reasons. Although I still love my birthday, I can now appreciate the changing colors, the crisp weather and all the fun activities that fall brings. This fall Delicious Paper Design is ready for it, there are lots of new fall items in my shop, but this is my absolute favorite of the banners:
Fall banner

I love rhinestones!
Love LOVE this patterned paper! 
The colors are perfect for fall, but still bright and cheery!
The patterned paper and rhinestones add  texture and visual interest to the banner.
This is such a simple banner that you can really put anywhere, but I love how the rhinestones and the patterned paper really make it special.

So that's my favorite new banner for this coming season. I hope you enjoyed it as much as I enjoyed creating it!

So....

What are you looking forward to this fall?

Monday, August 29, 2011

It's been awhile "Custom Monday"....nice to see you again

So I know I said about a month ago that I would be posting custom designs on Monday....well life sort of happened and I have been oh-so-busy with all the Delicious Paper Design orders that the blog has fallen to the wayside a little bit, but the good news is that I'm posting an awesome custom design inspired by the Etsy shop of yours truly!

I got a custom request for a cupcake themed birthday banner set. Here is the invitation inspiration from the client:
From LollipopPrints on Etsy
I was so excited to get started that I had so many ideas! I worked with the client to see what style of cupcake she liked (boy did I have a ton to choose from!) and here is the cupcake design she chose:

The star of the banner: The cupcake!
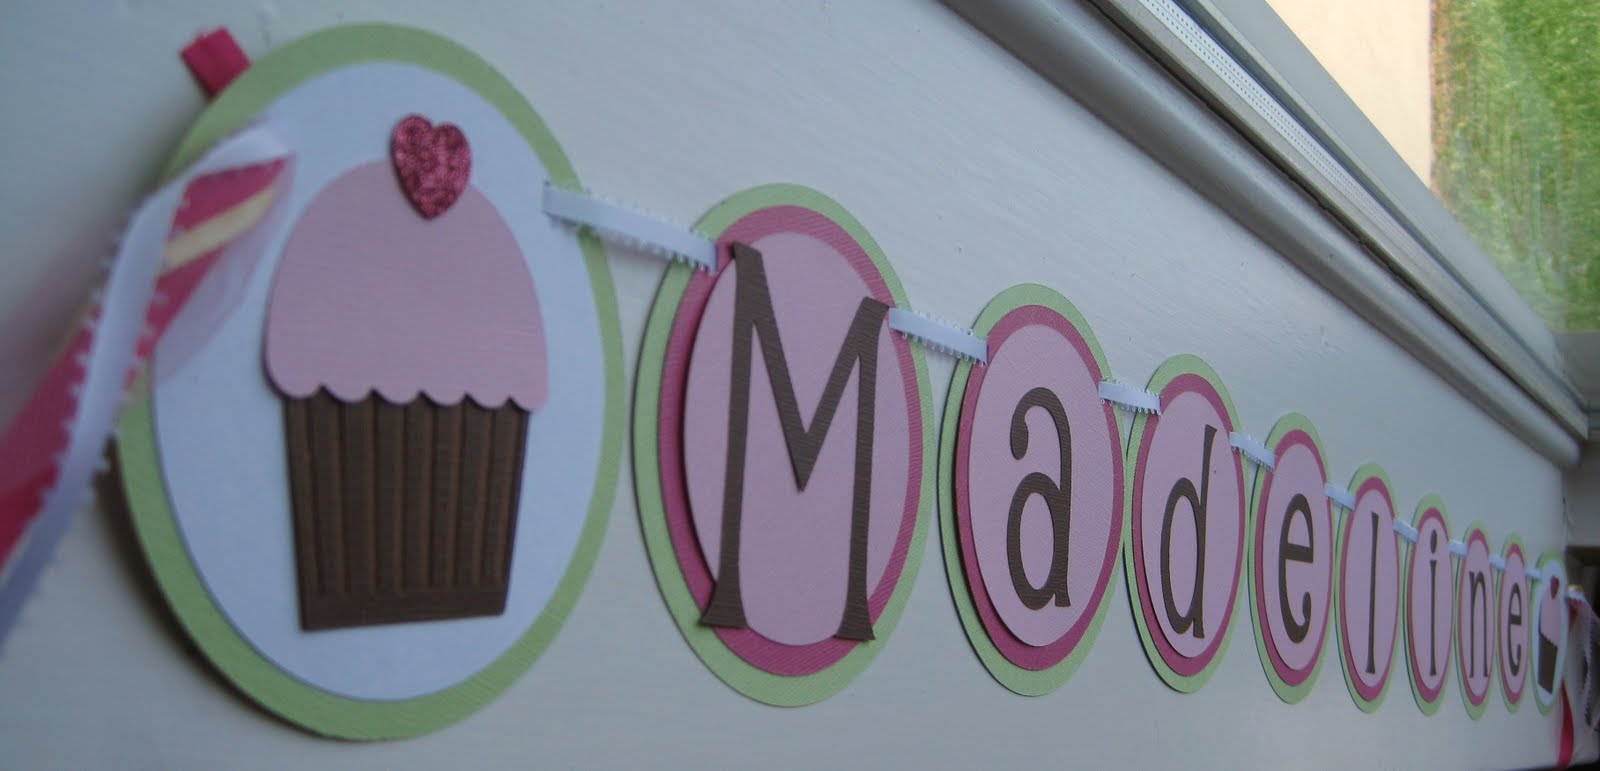
 The client wanted a name banner and a birthday banner. Here is how the name banner turned out:

Sweet little Madeline's name banner

I love the way the colors came out and the brown letter really pops!

I love how you can hang this after the party in a playroom or nursery.
 I think the birthday banner came out super cute too. This theme can really be for anyone, old or young...anyone with a sweet tooth! Just by removing the "1st" and let the white circle be the spacer for the banner you can reuse this over and over!
Add caption


I like to leave the circle between the two words white like the ends because I think it breaks up the words of the banner a little better. This way the words don't all run together. It also adds some visual interest and balances out the white on the ends as well.

So cute!

This banner (and all my birthday banners) measure over 6 feet long!
I think that this really turned out great! I love the way the cupcakes look, perfect for a sweet little girl! I think that this is going to be the next collection that I put out since I have been focusing mostly on the boys :)

What collection do you think I should add to Delicious Paper Design that would be a hit with kids?